I decided to cast my lot at Duluth and I gathered my little stock of leather and tools took a shoe man with me and started the 10th. of Feb. 1870 leaving my wife to come later traveling as far as Hinkley on the new road and then by the stage the balance of the way to Duluth took four days of very cold and suffering but got here ...
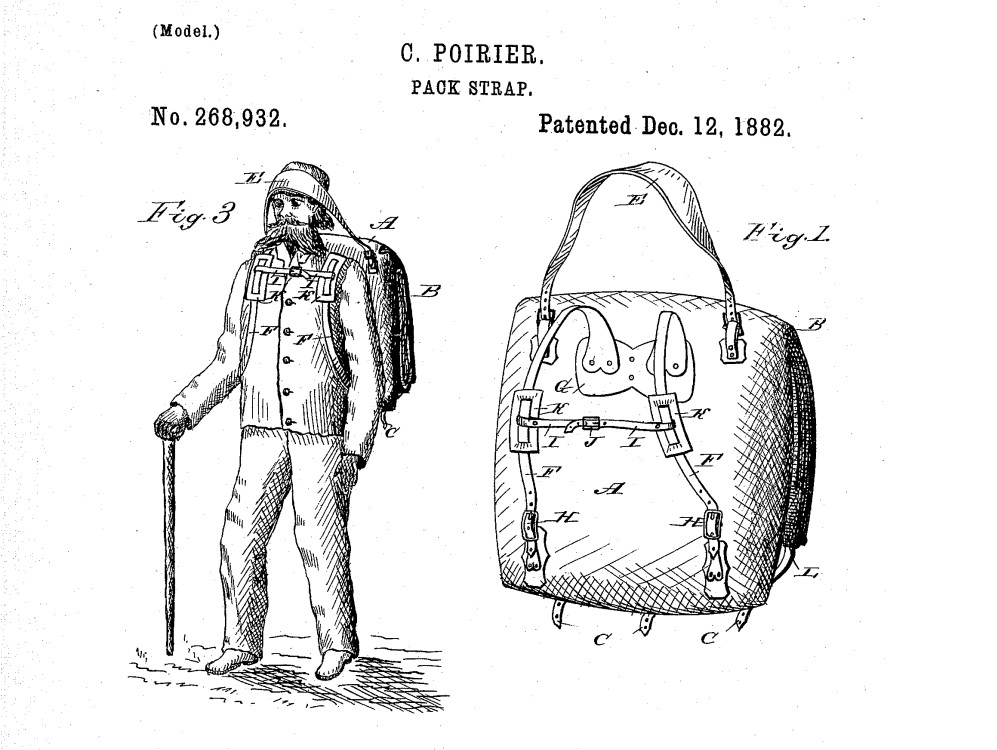
The work of Mr. Poirier led him to patenting the iconic "Duluth" Pack. A canvas pack design that has since become famous the world over among canoeists for being rugged, spacious, and easy to portage.
Mr. Poirier's patent includes an illustration of a hirsute gentleman wearing the pack with a tumpline (a strap worn across the forehead.) It may be that the Poirier pack takes its inspiration from the the packs of the French-Canadian voyageurs.
The patent claims that the object is to present "...a new and improved pack-strap for holding and packing articles of clothing, provisions, and other articles which are to be carried in a package on the back." This is critically important information to those of us who are confused as to how backpacks work, and subsequently find ourselves wandering portage trails while balancing piles of loose items in our arms.
Canoe packs differ from those used for mountaineering in that they are wider and can carry a much heavier load. Indeed, drawings published by the mountaineer Clinton Thomas Dent from the 18th and 19th centuries show packs for mountaineering having already taken the tall and narrow shape we are familiar with today. But on a canoe trip it is the canoe that does most of the carrying, with only the occasional call to carry the equipment, and sometimes the canoe itself, overland for any significant distance. Not to mention that if you find yourself going either up or down a mountain in a canoe, something has gone horribly wrong.
What the canoe pack shares with its mountaineering brethren is being an essential piece of gear. A failure such as a pack-strap ripping and consequently sending your equipment (and maybe you) into the mud of the portage trail is unacceptable.
Therefore there is great satisfaction to be had in making the things upon which you can rely. Nature doesn't care how good you think you are as an artisan. You can trust wilderness travel to test your work and mercilessly break anything that doesn't measure up.
The design process required careful study of both old and new packs. The design was simplified by not adding boxed corners, side-pockets, a breast strap, or a tumpline. It is with this in mind that I went about putting together my Poirier packs.
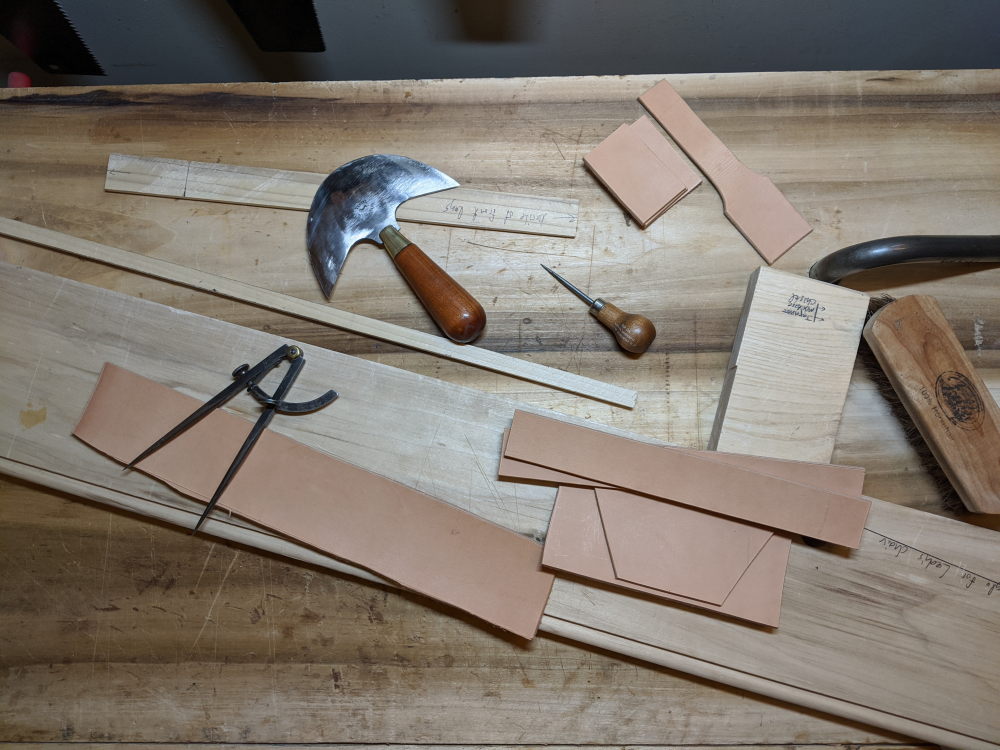
I chose vegetable tanned leather by Wickett & Craig (at the time of writing one of the two last remaining tanneries in the USA). The leather was a hefty 12oz, which is a thickness typical for making holsters, straps, and tool-belts.
Leather at this thickness is a challenge to work. It requires sharp tools and much care. A head-knife has a whole lot of cutting edge and requires balancing the amount of force necessary to cut through thick leather with the absolute requirement to keep the knife in control.
Care needs to be taken when choosing from where to cut the different pieces from the hide. Different parts of the hide vary in thickness and strength. Hide from animal's joints have natural creases while more static areas, such as the back, tend to be smooth. Choosing to make a strap from a section of hide with a thinning crease running through it would ultimately result in a torn strap and a lot of cursing.
Leather comes out of the tannery in a dry and stiff state. This makes it easy to make precise cuts and appealing bevels in the leather. But folding and creasing leather in this dry state can cause it to crack.
Therefore the next step is to patiently oil each piece. You can see the leather darken as it absorbs the oil and become pliable again. In this case I used neatsfoot oil, which is rendered from the shins and feet of cattle. As a consequence of coming from a part of the animal with a high surface-area to mass ratio, neatsfoot oil naturally remains soft even at low temperatures.
Wax is applied to the pieces once the oil has been completely absorbed. A few layers of carnauba or beeswax, followed by some spirited buffing will render the leather water-resistant.
The bag material chosen was 18oz canvas duck (from the Dutch doek, literally "cloth"). This heavy and durable material can stand up to lots of abuse, and ensures that the precious cargo inside (sleeping bags, tarps, booze, food, booze, etc.) remains protected throughout the trails, trials, and tribulations of the trip.
Working on the canvas required a heavy duty sewing machine equipped with some sacrificial needles.
The cloth can be waxed with a mix of paraffin and beeswax to help it repel water. Waxing cloth is tedious work, and involves incrementally dabbing small amounts of the wax on to the canvas and applying heat to spread it. Heating the canvas to melt the wax can be done with heat-gun, but it is a more pleasant experience to set the newly waxed cloth out in the sun on a hot day, or next to the fireplace on a cold one.
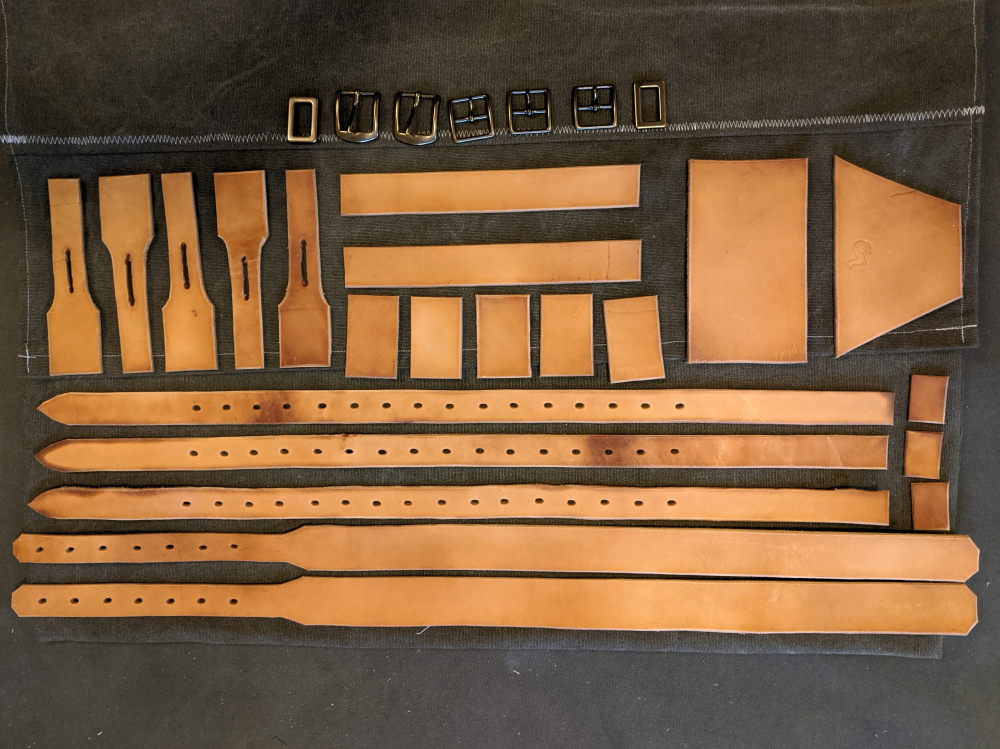
Brass hardware is a great choice for both corrosion resistance and looks. Modern alloys of zinc and copper have been used for over 400 years, but older forms of brass (sometimes actually referring to bronze) go back over 4,000 years.
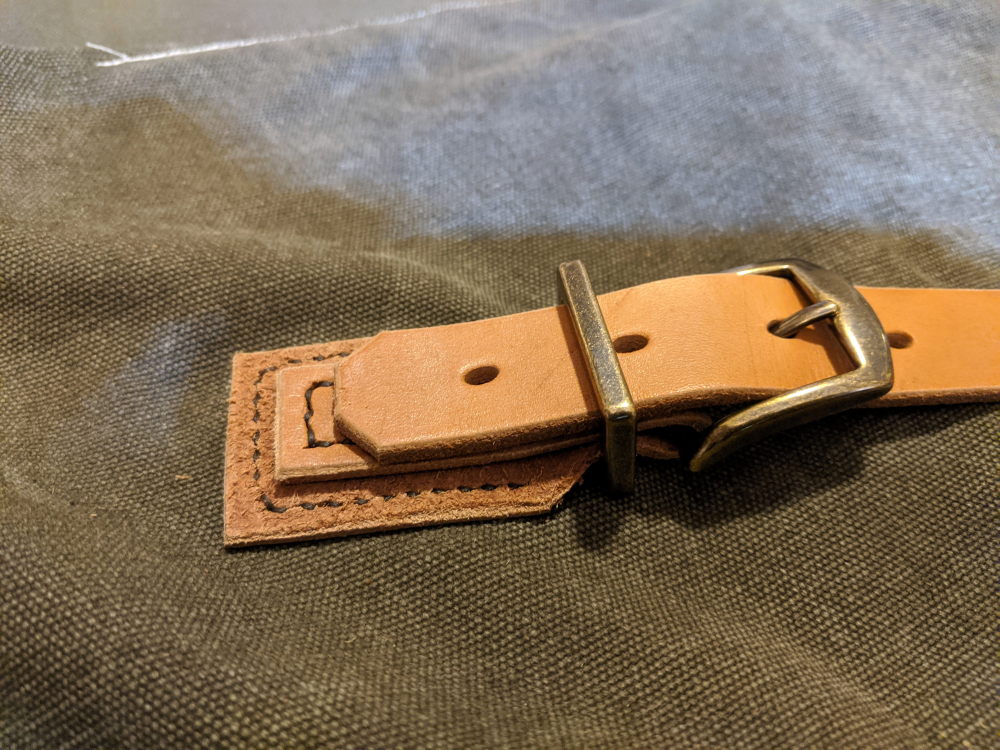
The original patent doesn't specify the type of metal, but clearly shows rivets. I don't know how to set brass rivets reliably, and this pack isn't for just for show, so I decided to use brass hardware for buckles but replace the brass rivets with saddle-stitching.
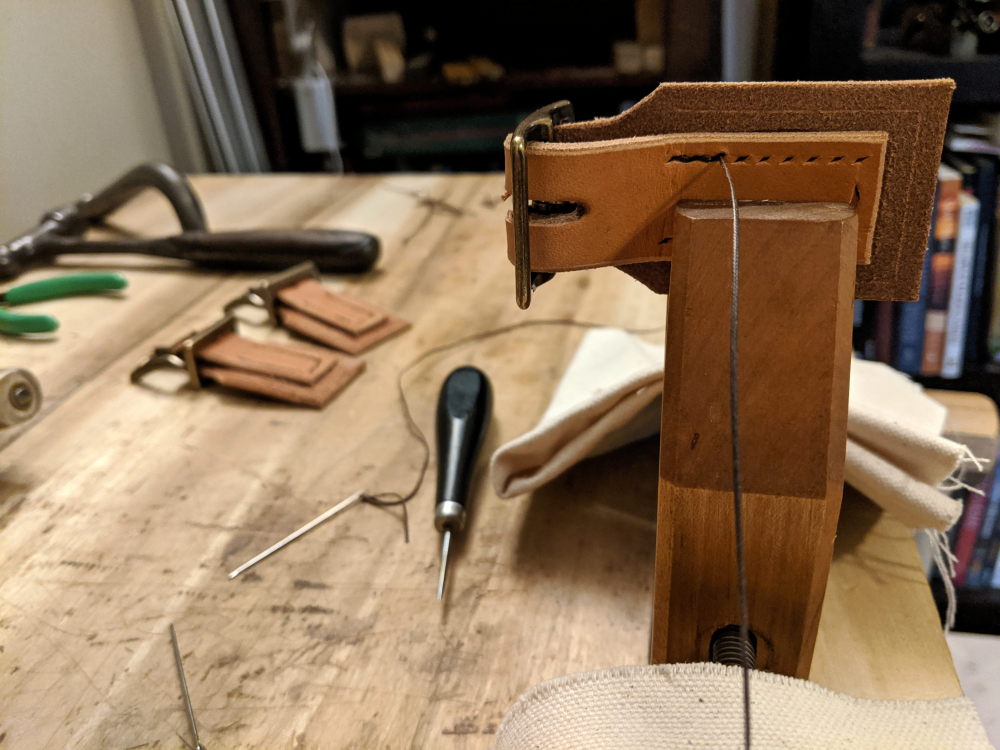
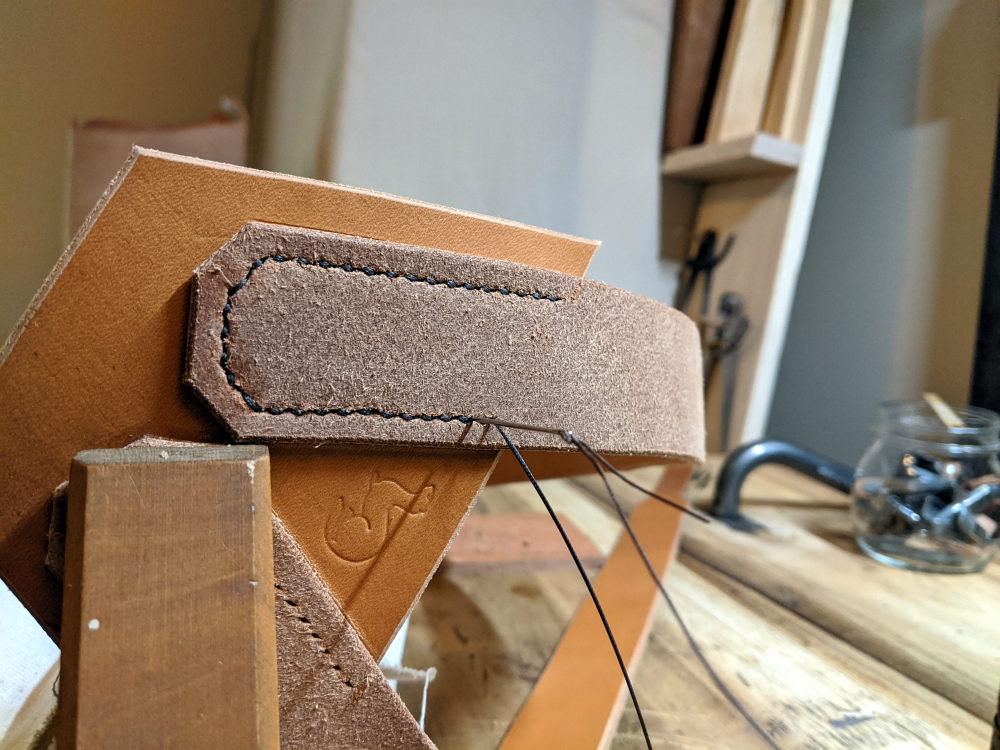
Saddle-stitching leather is challenging to learn, demands diligence to improve, but is bomb-proof when done right. This is as it should be, since a stitch unraveling on a riding harness could spell injury or death to a rider.
My thread of choice is a modern, synthetic, thread made in Germany and Ukraine which is referred to by leather-workers as "tiger thread" (there is a tiger on the package; I guess leather-workers aren't very imaginative.) It is an instance of where the wise crafts-person can choose to harmonize the old with the new.
Saddle stitching leather is a quiet, and contemplative process. Your eyes and hands are constantly engaged as you cross the two needles back and forth, one needle in each hand, always avoiding piercing the thread (or your hand). You develop a feel for the correct tension of the thread and the "give" of the leather as you pull each stitch tight.
A mere few thousand stitches later the process leaves your conscious mind and sets up shop in that part of the brain where skills live. Skills such as dovetailing, and that pen trick that Val Kilmer does in the movie Top Gun. It is at that point that you can take on larger projects that require many hundreds of reliable stitches.
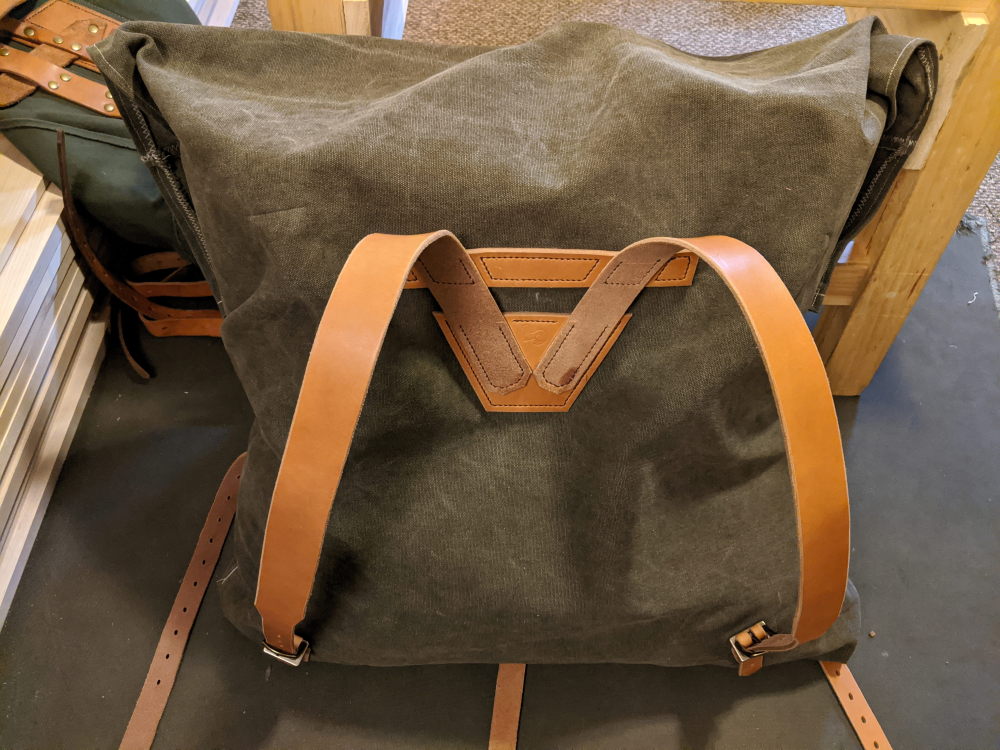
Mr. Poirier's patent states that: "Two shoulder-straps ... have their upper ends secured to a piece of leather ... on the bag". Here the canvas cloth is sandwiched in between three large pieces of leather; one on the inside of the pack and two on the outside. The uppermost of the two external pieces help position and support the shoulder straps.
The inside of the shoulder straps can, at least theoretically, be lined with deer leather and padded. But I was on a tight budget in terms of time, patience, and talent.
What resources I had were deployed in carefully considering where to place stitches by taking into account where the weight of the pack will strain the straps. For instance, there is a need to avoid perforating the leather by stitching across the direction of strain, that is, unless you want your leather to easily tear off in neat sections like squares of toilet paper.
A small stitching project such as a knife sheath is easy to handle and straightforward to clamp in place. In contrast, the finishing stages of stitching the pack require simultaneous access to the inside and the outside of the pack. This proved frustrating for spots such as the lower shoulder harness anchors, and just really annoying for the back. If I had given in to my flagging patience at this point, I knew I would be repaid in ignominy later; and nobody wants that.
Hammered rivets are more straightforward and faster to install compared to hand stitching leather. But I don't think that they necessarily make for a stronger pack.
Modern makers of camping equipment seem to go out of their way to find the most glaring, unnatural and garish color for their nylon tents, packs and such. Looking at a campsite resplendent in modern camping equipment is as pleasant an experience as being poked in the eye with a stick.
I guess is that this is to make the equipment stand out on a store shelf or display, with the different manufacturers in an arms race to have their products be the most conspicuous.
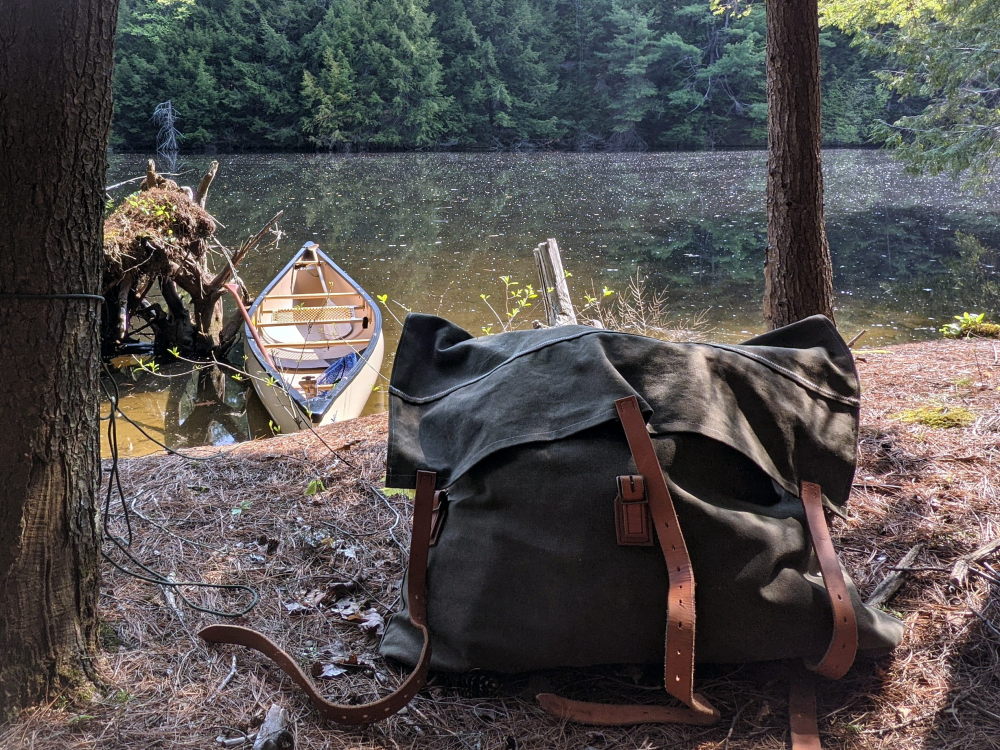
My outfit for a week-long trip is a pair of these Duluth-style packs and a backpack. The packs carry the majority of the stuff and weight (sleeping bag, tarps, food, bottle of 1946 Château d'Yquem, etc.), while the backpack serves for day-trips and carries quick-access items (first-aid kit, cordage, toiletries, belt-fed M60 SMG, etc.)
First, you place everything that needs to protection from rain (and upside-down canoeing) in a thoroughly modern synthetic dry-bag. A dry-bag can be thrown into a lake without taking on water but, like my mood, is sensitive to abrasion and punctures easily. Second, the dry bag goes into the canvas cloth pack, which can withstand being dragged across the forest floor without abrading and shrugs off the pointiest of rocks with impunity. The two together, old and new, are a winning combination.
Mr. Poirier has handed us down a wonderful pack design. I'll make sure to raise a toast to him one day on the trail.